Authentication
You can implement user authentication ("Login with X" buttons) in your Flet app using 3rd-party identity providers such as GitHub, Google, Azure, Auth0, LinkedIn and others.
Identity provider must support OAuth 2.0 Authorization Code Flow to retrieve API access token.
Built-in Flet login with credentials and user management is planned for future releases. If you have a requirement to create and manage user accounts in your app you can implement it by your own or use Auth0 identity provider which provides a generous free tier.
Flet authentication features:
- Works with Flet desktop, web and mobile apps.
- Using multiple authentication providers in one app.
- Built-in OAuth providers with automatic user details fetching:
- GitHub
- Azure
- Auth0
- Optional groups fetching.
- Automatic token refresh.
- Login with a saved token ("Remember me").
- Custom OAuth providers.
Login process overview
- Configure OAuth provider (built-in or generic) with Client ID, Client secret, Redirect URL.
- Call
await page.login(provider)to initiate OAuth web flow. - User is being redirected to OAuth provider website.
- On provider website user signs in and gives consent to access service API with requested scopes.
- Provider website redirects to Flet's OAuth callback URL with authorization code.
- Flet exchanges authorization code for a token and calls
page.on_loginevent handler. - Flet app can retrieve API token with
await page.auth.get_token()and user details frompage.auth.user.
Configuring OAuth provider
Flet has the following built-in OAuth providers:
- GitHub
- Azure
- Auth0
Additionally, you can configure a generic OAuth provider and provide authorization, token and user info endpoints.
In this guide we will configure Flet login page with GitHub account.
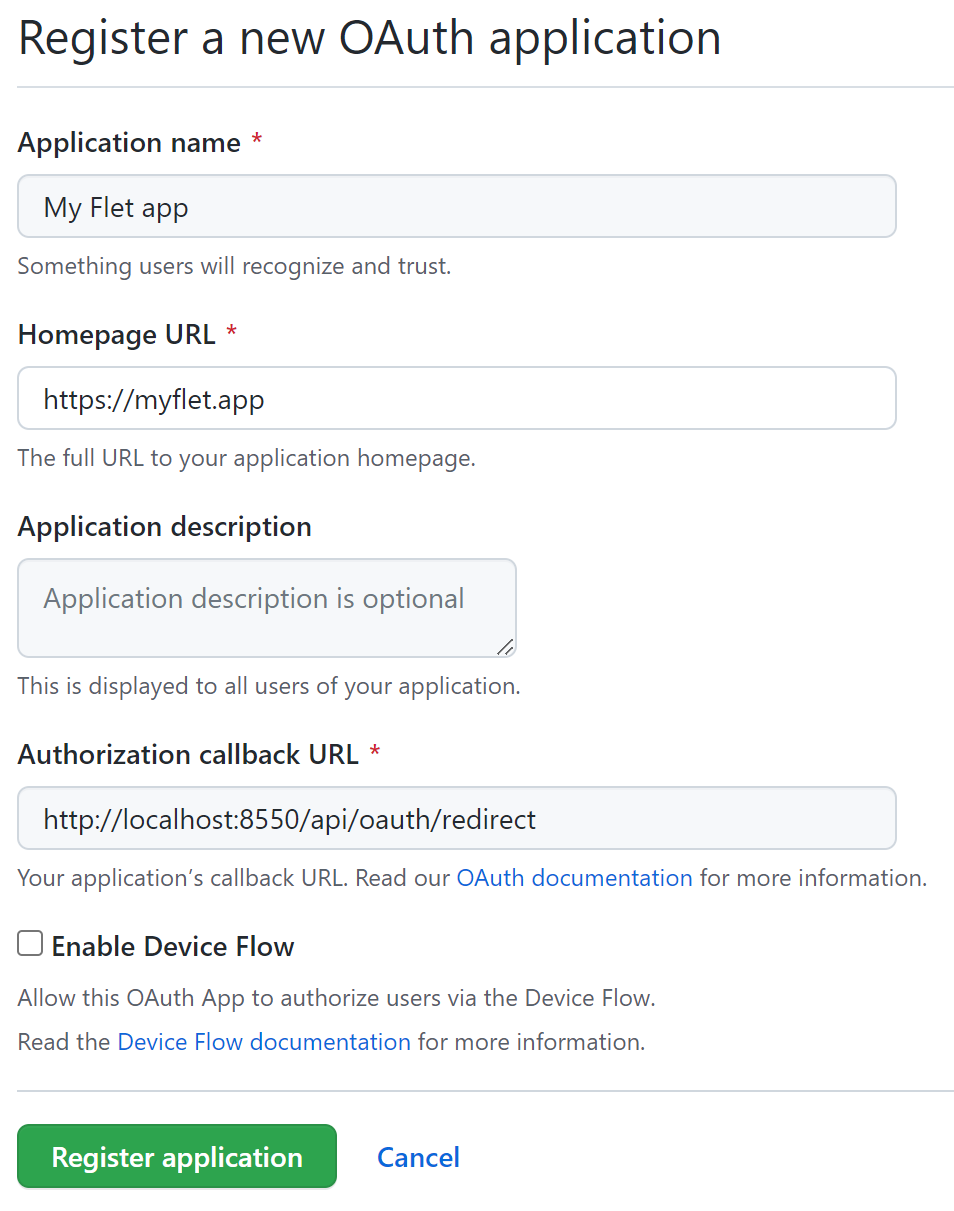
To integrate Flet authentication with GitHub a new GitHub OAuth app should be registered first (Profile settings → Developer settings → OAuth Apps).
Authorization callback URL should be in the format:
{application-url}/oauth_callback
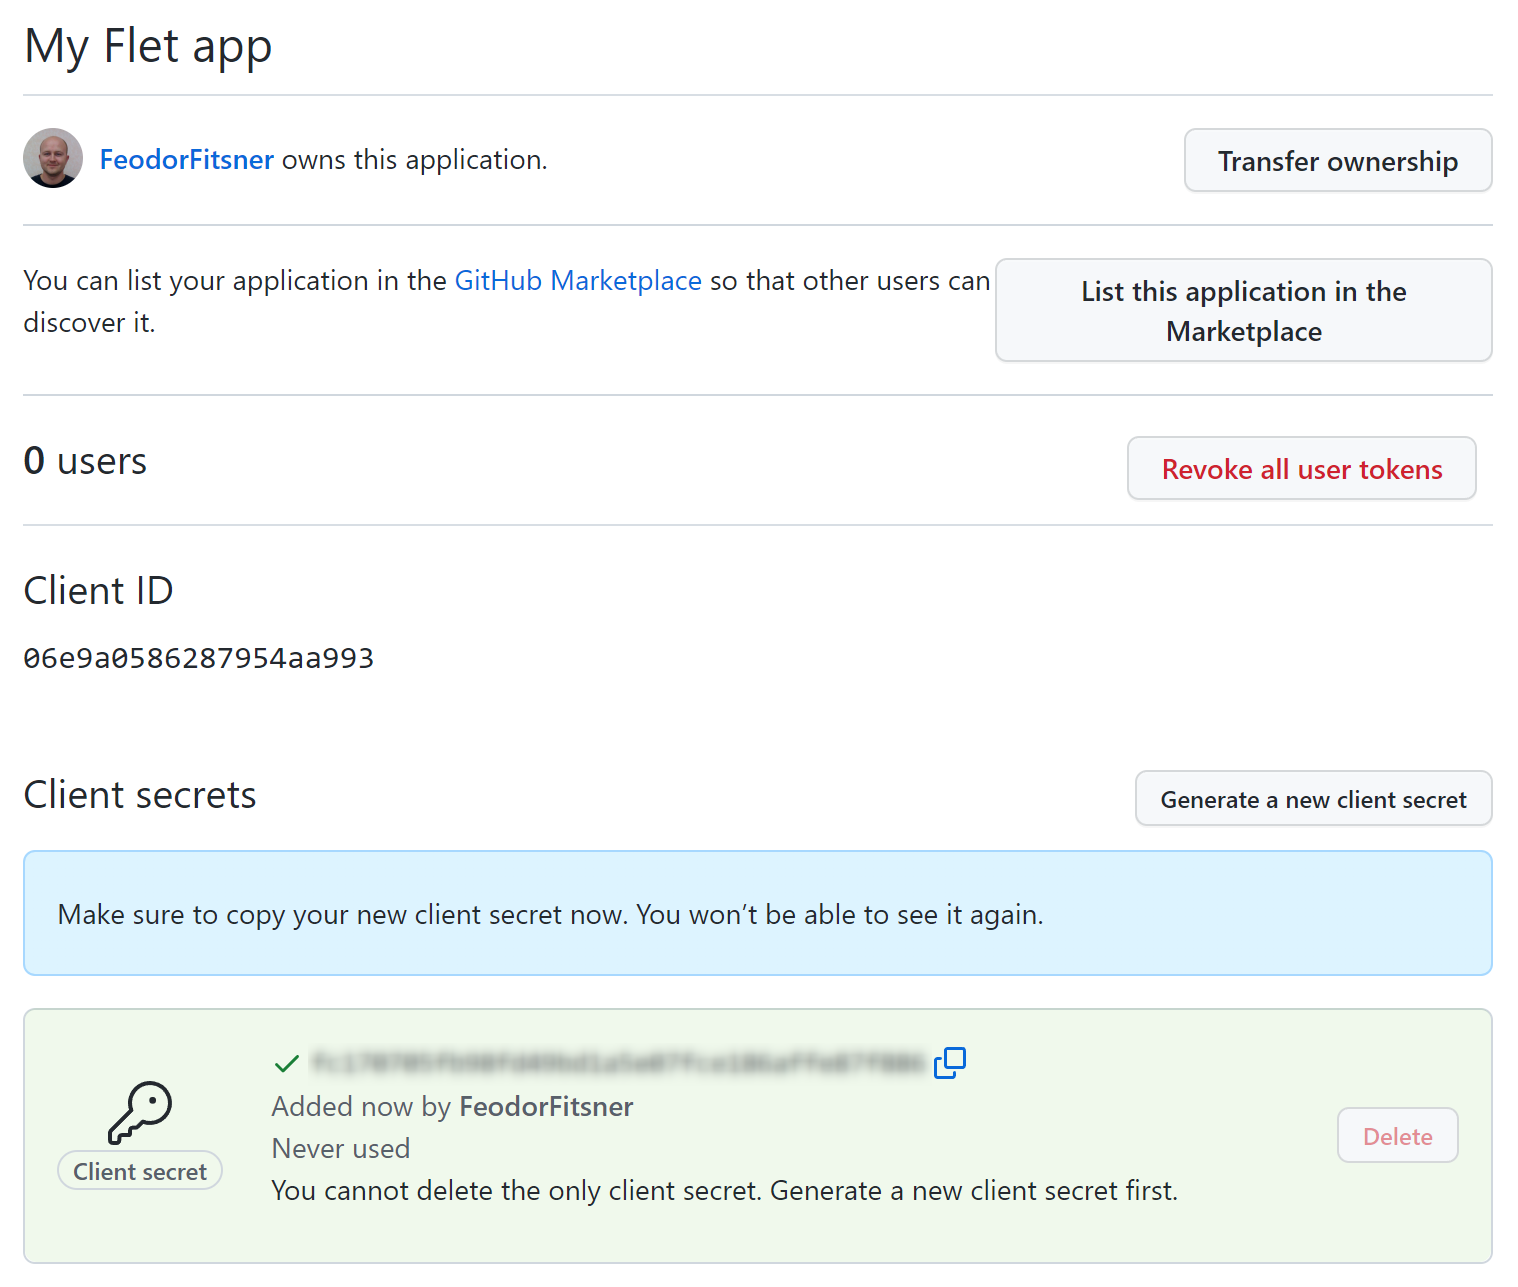
On OAuth app details page click "Generate a new client secret" button. Copy "Client ID" and "Client secret" values to a safe place - you'll need them in a Flet app.
Sign in with OAuth provider
Authentication calls are asynchronous. Use them in async def event handlers or
an async main(); the shorter snippets below assume this async context.
import os

import flet as ft
from flet.auth.providers import GitHubOAuthProvider

GITHUB_CLIENT_ID = os.getenv("GITHUB_CLIENT_ID")
assert GITHUB_CLIENT_ID, "set GITHUB_CLIENT_ID environment variable"
GITHUB_CLIENT_SECRET = os.getenv("GITHUB_CLIENT_SECRET")
assert GITHUB_CLIENT_SECRET, "set GITHUB_CLIENT_SECRET environment variable"

def main(page: ft.Page):
    provider = GitHubOAuthProvider(
        client_id=GITHUB_CLIENT_ID,
        client_secret=GITHUB_CLIENT_SECRET,
        redirect_url="http://localhost:8550/oauth_callback",
    )

    async def login_click(e):
        await page.login(provider)

    async def on_login(e):
        if e.error:
            print("Login error:", e.error)
            return
        token = await page.auth.get_token()
        print("Access token:", token.access_token)
        print("User ID:", page.auth.user.id)

    page.on_login = on_login
    page.add(ft.Button("Login with GitHub", on_click=login_click))

ft.run(main, port=8550, view=ft.AppView.WEB_BROWSER)
Notice, we are fetching OAuth app client ID and client secret from an environment variables. Do not embed any secrets into source code to avoid accidental exposure to a public!
Before running the app set the secret environment variables in a command line:
$ export GITHUB_CLIENT_ID="<client_id>"
$ export GITHUB_CLIENT_SECRET="<client_secret>"
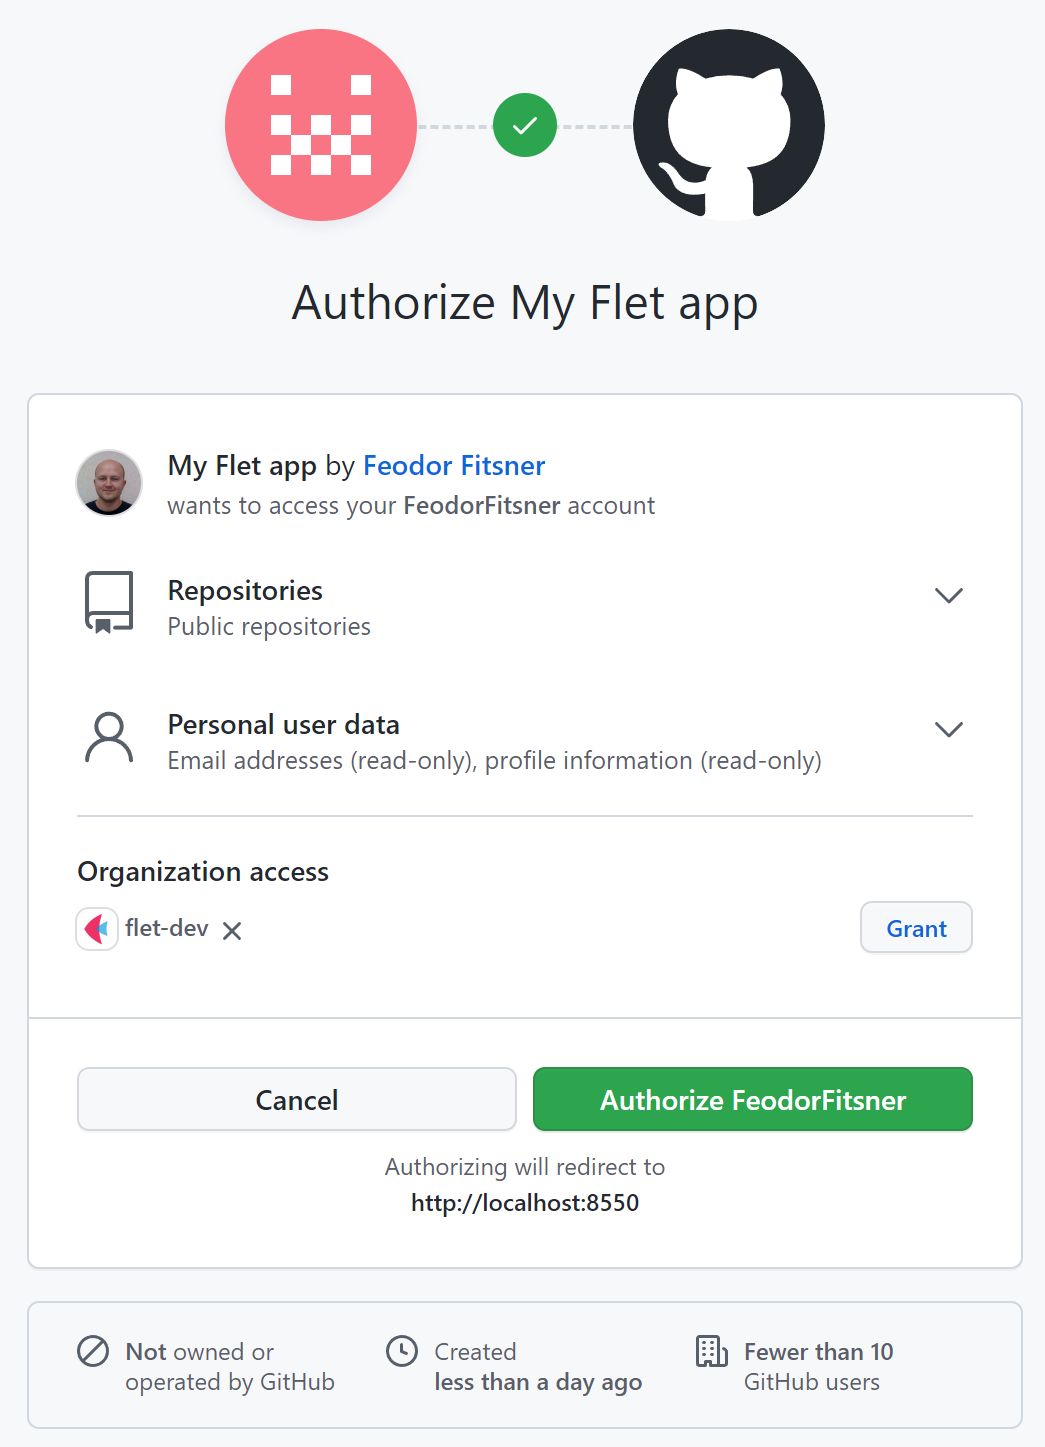
Run the program and click "Login with GitHub" button. GitHub authorize app page will be opened in:
- Desktop app - a new browser window or tab.
- Web app - a new popup window (make sure popup blocker is off).
- Mobile app - an in-app web browser.
Redirect URL
We used http://localhost:8550/oauth_callback as a redirect URL while registering GitHub OAuth app.
Notice it has a fixed port 8550. To run your Flet app on a fixed port use port argument in the ft.run() call:
ft.run(main, port=8550)
Scope
Most of OAuth providers allows applications to request one or more scopes to limit application's access to a user's account.
Built-in Flet providers, by default, request scopes to access user profile, but you can request additional scopes in login method, like public_repo in the example above:
await page.login(
    provider,
    scope=["public_repo"]
)
page.login() method has a number of arguments to control authentication process:
fetch_user(bool) - whether to fetch user details intopage.auth.user. Default isTrue.fetch_groups(bool) - whether to fetch user groups intopage.auth.user.groups. Default isFalse.scope- a list of scopes to request.saved_token- a JSON snapshot of the OAuth token to restore authorization from. Retrieve the token withawait page.auth.get_token(), serialize it withtoken.to_json(), then encrypt and save it in client storage. See below.on_open_authorization_url- a callback to open a browser with authorization URL. See below.complete_page_html- a custom HTML contents of "You've been successfully authenticated. Close this page now" page.redirect_to_page(bool) - used with Flet web app only when authorization page is opened in the same browser tab.
Awaiting page.login() returns an authorization object. The default implementation provides:
get_token()- an async method that returns the OAuth token, refreshing it when needed. See below.user- user details with a mandatoryidfield and other fields specific to OAuth provider.provider- an instance of OAuth provider used for authorization.
A reference to the last authorization is saved in page.auth property.
If your app allows authorizations with multiple OAuth providers you can save authorizations in a session, for example:
page.session["github_auth"] = await page.login(github_provider)
page.session["google_auth"] = await page.login(google_provider)
Checking authentication results
Upon successful or failed authorization page.on_login event handler is called.
Event handler argument e is an instance of LoginEvent class with the following properties:
error(str) - OAuth error.error_description(str) - OAuth error description.
Authorization was successful if error is an empty string.
You can use this event handler to toggle signed in/out UI, for example:
import os

import flet as ft
from flet.auth.providers import GitHubOAuthProvider

def main(page: ft.Page):
    provider = GitHubOAuthProvider(
        client_id=os.getenv("GITHUB_CLIENT_ID"),
        client_secret=os.getenv("GITHUB_CLIENT_SECRET"),
        redirect_url="http://localhost:8550/oauth_callback",
    )

    async def login_button_click(e):
        await page.login(provider, scope=["public_repo"])

    def on_login(e: ft.LoginEvent):
        if not e.error:
            toggle_login_buttons()

    def logout_button_click(e):
        page.logout()

    def on_logout(e):
        toggle_login_buttons()

    def toggle_login_buttons():
        login_button.visible = page.auth is None
        logout_button.visible = page.auth is not None
        page.update()

    login_button = ft.Button("Login with GitHub", on_click=login_button_click)
    logout_button = ft.Button("Logout", on_click=logout_button_click)
    toggle_login_buttons()

    page.on_login = on_login
    page.on_logout = on_logout

    page.add(login_button, logout_button)

ft.run(main, port=8550, view=ft.AppView.WEB_BROWSER)
Accessing user details
If page.login() method is called with fetch_user=True (default) a user profile will
be assigned to page.auth.user.
All built-in OAuth providers implement user.id property - unique user identifier - which value depends
on the provider (a number, Guid or email) and can be used in your app as a user key.
The rest of user profile properties depends on provider and can be accessed with an indexer. For example, to print some properties of GitHub user:
print("Name:", page.auth.user["name"])
print("Login:", page.auth.user["login"])
print("Email:", page.auth.user["email"])
Using OAuth token
After successful authorization, retrieve the OAuth token with
token = await page.auth.get_token(). The token has the following properties:
access_token- access token used as an authorization token in API request headers.scope- token's scope.token_type- access token type, e.g.Bearer.expires_in- optional number of seconds until the token expires.expires_at- optional time (time.time()+expires_in) when the token expires.refresh_token- optional refresh token used to obtain a new access token.
Use token.access_token to call the provider's API. For example, this async
handler lists the user's GitHub repositories without blocking the app's event loop:
import asyncio
import requests

async def list_repositories(e):
    token = await page.auth.get_token()
    headers = {"Authorization": f"Bearer {token.access_token}"}
    response = await asyncio.to_thread(
        requests.get, "https://api.github.com/user/repos", headers=headers, timeout=30
    )
    response.raise_for_status()
    for repo in response.json():
        print(repo["full_name"])
Call await page.auth.get_token() before each API operation so Flet can refresh
an expired token. Keeping a token from an earlier operation and reusing its
access_token later bypasses that refresh check.
Saving and restoring an auth token
To implement persistent login ("Remember me" checkbox on login page) you can save auth token in a client storage and use it to login next time a user opens your Flet app.
To serialize auth token to JSON:
token = await page.auth.get_token()
jt = token.to_json()
Encrypt sensitive data before sending it to a client storage.
Flet includes utility methods for encrypting text data using symmetric algorithm (where the same key is used for encryption and decryption). They use Fernet implementation from cryptography package, which is AES 128 with some additional hardening, plus PBKDF2 to derive encryption key from a user passphrase.
To encrypt JSON token:
import os
from flet.security import encrypt, decrypt

secret_key = os.getenv("MY_APP_SECRET_KEY")
# returns base64-encoded string
ejt = encrypt(jt, secret_key)
Notice, we are fetching a secret key (aka passphrase, password, etc.) from an environment variable. Do not embed any secrets into source code to avoid accidental exposure to a public!
Before running the app set the secret in a command line:
$ export MY_APP_SECRET_KEY="<secret>"
Now, encrypted value can be stored in a client storage:
prefs = ft.SharedPreferences()

await prefs.set("myapp.auth_token", ejt)
Next time a user opens the app you can read encrypted token from a client storage and, if it exists,
decrypt it and use in page.login() method:
ejt = await prefs.get("myapp.auth_token")
if ejt:
    jt = decrypt(ejt, secret_key)
    await page.login(provider, saved_token=jt)
Signing out
Calling page.logout() resets page.auth reference and triggers page.on_logout event handlers.
You can remove saved token in logout method, for example:
async def logout_button_click(e):
    await prefs.remove(AUTH_TOKEN_KEY)
    page.logout()
Customizing authorization flow
By default, OAuth authorization flow is happening in either new browser window/tab (desktop app), browser popup window (web) or in-app web view (mobile).
Upon completion of authorization flow a user is redirected to Flet's OAuth callback page (/oauth_callback) which tries to close a browser window/tab with JavaScript and provides user with instructions to close the window manually if JavaScript close didn't work.
This section is applicable to Flet desktop and web apps only as in-app web view in mobile apps can be closed by Flet without relying on JavaScript.
You can customize the contents of "Authorization complete" page in page.login() method, for example:
complete_page_html = """
<!DOCTYPE html>
<html>
  <head>
    <title>Signed in to MyApp</title>
  </head>
<body>
  <script type="text/javascript">
      window.close();
  </script>
  <p>You've been successfully signed in! You can close this tab or window now.</p>
</body>
</html>
"""

await page.login(
    provider,
    complete_page_html=complete_page_html,
)
You can also change web app to open provider's authorization page in the same tab which might be more familiar to your users and save them from dealing with popup blockers:
await page.login(
    provider,
    on_open_authorization_url=lambda url: ft.UrlLauncher().launch_url(url, web_only_window_name="_self"),
    redirect_to_page=True
)
To open flow in a new tab (notice _self replaced with _blank):
await page.login(
    provider,
    on_open_authorization_url=lambda url: ft.UrlLauncher().launch_url(url, web_only_window_name="_blank")
)
Configuring a custom OAuth provider
You can configure any OAuth-compatible authentication provider in your app with flet.auth.oauth_provider.OAuthProvider class.
Following the instructions in LinkedIn Authorization Code Flow guide we are able to get all required parameters to configure LinkedIn OAuth provider to allow users of your Flet app to login with their LinkedIn accounts:
import os

import flet
from flet import Button, Page
from flet.auth import OAuthProvider

def main(page: Page):
    provider = OAuthProvider(
        client_id=os.getenv("LINKEDIN_CLIENT_ID"),
        client_secret=os.getenv("LINKEDIN_CLIENT_SECRET"),
        authorization_endpoint="https://www.linkedin.com/oauth/v2/authorization",
        token_endpoint="https://www.linkedin.com/oauth/v2/accessToken",
        user_endpoint="https://api.linkedin.com/v2/me",
        user_scopes=["r_liteprofile", "r_emailaddress"],
        user_id_fn=lambda u: u["id"],
        redirect_url="http://localhost:8550/oauth_callback",
    )

    async def login_click(e):
        await page.login(provider)

    async def on_login(e):
        if e.error:
            raise RuntimeError(e.error)
        print("User ID:", page.auth.user.id)
        token = await page.auth.get_token()
        print("Access token:", token.access_token)

    page.on_login = on_login
    page.add(Button("Login with LinkedIn", on_click=login_click))

flet.run(main, port=8550, view=flet.AppView.WEB_BROWSER)
Mandatory provider settings:
client_idclient_secretauthorization_endpointtoken_endpointredirect_url
Similar to other examples client ID and client secret are fetched from environment variables.